
Trimming Flying Geese!
using a regular quilting ruler!
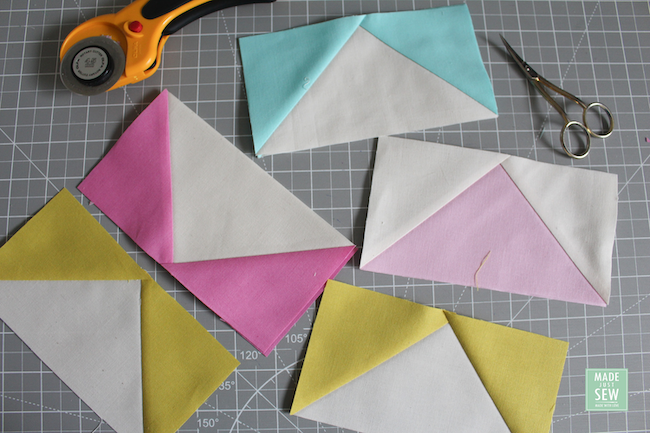
Everyone has a block that they dread and mine is flying geese! I don’t know why, they never come easily to me. So I naturally avoid using them in quilting patterns. But for the Sweet Wonder Quilt I took the leap and put them in!
So I wrote this blog post with like minded people in mind. If you are ever stuck for how to trim your geese - this how I do it! And most importantly there is no fancy special flying geese rulers needed - just use a regular quilting ruler!
what you will need:
Regular quilting ruler, I used a 6.5”x12” quilting ruler
Rotary Cutter
Cutting Mat

So let’s start at the very beginning and how we make your flying geese.
In the Sweet Wonder Quilt pattern I use a 4-at-a-time method. I designed them to make them roomy so they could be trimmed to size. Some people will love this approach, some will hate it - but I feel this is the same with every quilting technique. For me, this was the way I could consistently be more accurate. Choose a method that suits you (there are no hard or fat rules. Just make sure you enjoy it!)
So let’s make a start!
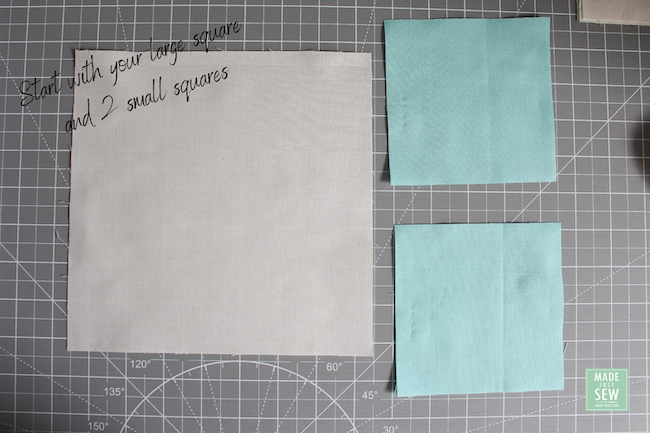
Step 1: Take your large square and 2 smaller squares. (Use your quilt pattern for the cutting instructions and cut to size)

Step 2: Place your small squares opposite each other. They should overlap slightly in the middle. Draw a line diagonally across the 2 small squares.
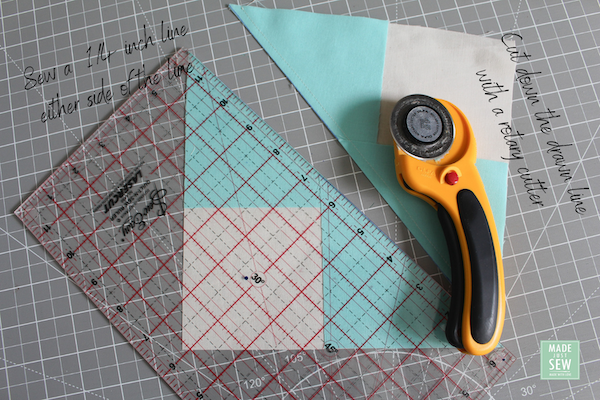
Step 3: Sew a 1/4” seam either side of the line and cut down the middle with a rotary cutter.

Step 4: Press the seams to the one-side towards the small squares. Place a 3rd small square in the corner and draw a diagonal line down the middle,

Step 5: Sew a 1/4” line either side of the line and cut down the middle with a rotary cutter.

Step 6: Press the seams to the one-side towards the small squares.
Once you have your Flying Geese made, you will need to trim them to size. Refer to your quilt pattern for the finished trimmed size.
This is how I trim my Flying Geese:
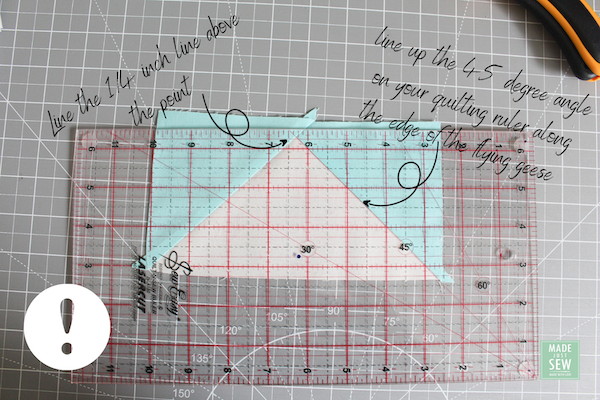
Step 7: IMPORTANT STEP! Line up the 45 degree line on your quilting ruler with the edge of your flying geese where the 2 fabrics meet (see pic above). THEN also line up the 1/4” line at the top of the ruler with the point of the flying geese.
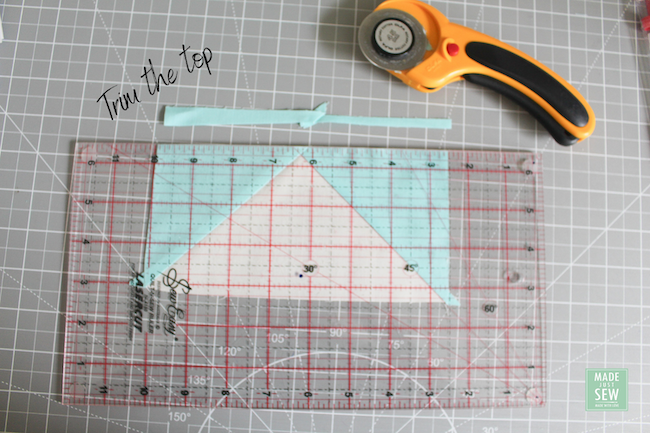
Step 8: Trim the top edge off the block.

Step 9: Move the ruler to trim the bottom edge. Line up the top of the block on the line for the size you need the block to be. (This block will be trimmed to 6.5” x 3.5”)

Step 10: Trim the shorter edges. Line up the ruler against the longer edges. Make sure to keep the middle point of the finished size matched up with the point go the flying geese (see pic above). Note: this quilting ruler with the same width as the finished block so did not need to be moved. If your ruler is not the same size trim one side and then the other.

Step 11: Ta Da - you have trimmed your flying geese blocks to perfection!

I hope this tutorial helps anyone new to flying geese, or just anyone who has been lost like me! And to quote some early 90’s lyrics from Montell Jordan -“This is how we do it” - well it’s how I make my flying geese at least! (click the link if you have no idea what I’m talking about!)
If you would like to see how these flying geese look in the Sweet Wonder Quilt - make sure to check out my amazing testers blog post - all of whom put my method to practise and pulled it off! Their versions of this quilt pattern are STUNNING!
Enjoy sewing everyone,
